Native Ios access SDK in depth explanation
Native Ios access SDK in depth explanation
This article will guide you step by step on how you can integrate the spintly access sdk into your app. Spintly do provide a sample app and sample app source code on how the app can integrate with the spintly access sdk, if you havent got the app please contact Spintly for the same, as the sample app will help you understand things faster. For this SDK integation to happen you need to either do the type2 or type3 integration.
Once the client is done integrating the sdk in thier app, the app needs to be sent to spintly for review, this review is needed so that the sdk is properly used in the client app in accordance to spintly standard, Once spintly approves the app, the client can go ahead and release the app on playstore and appstore.
Please note you cannot integrate spintly access sdk standalone, it will always go hand in hand with the api
1 Changes required in the client app to support Spintly SDK
There are certain steps we need to follow at different stages of the app flow. Following are the locations where sdk-related changes need to be added.
1. During app initialization
2. After login
3. Mandatory checks
4. Getting a list of doors
5. Starting Bluetooth scan
6. Opening doors
7. On notification
8. Logout
2 SDK Details
Spintly integration requires the following SDKs to be used by the client app:
- OAuth SDK: This SDK is used for getting a Spintly access token in exchange for the user's client jwt token.
- Access control SDK: This SDK contains the actual access control functionality
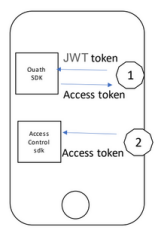
3 High-Level Overview
Spintly uses Auth 2.0 Token Exchange, for more information please visit this site:
https://datatracker.ietf.org/doc/html/rfc8693
Here in the diagram you can see the JWT token is given to the OAuth SDK and in return, the OAuth SDK returns the access token. This access token is then passed to the Spintly access control SDK.
4 During App Initialization: OAuth SDK
Before using the sdk, the developer needs to specify the clientId , provider and environment. The clientId and provider id will be provided by the Spintly Support person to the developer. The environment will be specified by the developer based on whether the developer is building the app for production or a sandbox environment. Different clientId and providers will be provided for the production and sandbox environment.
let clientId: String = "aabbasssd...."
let provider: String = "assaa...."
let environment: String = SpintlyOauthManager.PRODUCTION //or SpintlyOauthManager.SANDBOX
let spintlyOauthManager = SpintlyOauthManager(clientId, provider, environment)
5 During app initialization: Access Control SDK
Just like the OAuth SDK on the previous page, the environment needs to be set for the access control SDK after its instance is initialized.
//To initialize the SDK and set up the environment do the following steps. Make sure this is done before using any of the other functions to ensure proper behaviour. Preferably in application didFinishLaunching
let serviceProvider = SpintlyACServiceProvider.defaultInstance

let environment: String = Environment.PRODUCTION // or Environment.SANDBOX
let environmentManager = serviceProvider.environmentManager
environmentManager.setEnvironment(environment)
//This function will throw error if unknown environment is passed
//If you want to know the current environment
let currentEnvironment: String = environmentManager.getEnvironment()
6 After login: OAuth SDK
The user's client jwt token which was obtained after the user logged in to the app, needs to be passed to the OAuth SDK. The OAuth SDK in return will give back a Spintly access token.
Note: Here the user's client JWT token contains a unique Id that identifies a particular user, this unique Id must be added to Spintly using the Spintly backend APIs.
let delegate = self
spintlyOauthManager.createSession(delegate)
//This will create new token on every call
//If you want to first try getting existing session call the following instead
spintlyOauthManager.getOrCreateSession(delegate)
extension YourClass: AuthorizationDelegate {
func didGetSession(_ session: SpintlyOauthSession) {
let accessToken: String = session.accessToken!.jwtToken
//To be passed to other Spintly services that make use of this token
}
func getAuthenticationDetails(_ continuation: AuthenticationContinuation) {
// this is called when user is logged out or all tokens have been expired and
// need login parameters again from the client.
// For Token Exchange grant type authorization:
let authenticationDetails =
AuthenticationDetails.createWithTokenExchangeGrantType(clientToken)
continuation.setAuthenticationDetails(authenticationDetails)
continuation.continueTask()
// If clientToken was not available when this function was called,
// hold on to the continuation reference and once clientToken is acquired,
// repeat the above steps.
// Or call createSession again and repeat the process
}
func didFailWithError(_ error: Error) {
// Any error including network errors will come here;
}
}
7 After login: Access Control SDK
The Spintly access token that is generated by the OAuth SDK is then passed to the Spintly access control SDK . After this step the access control functionality of SDK can be used.
Note: The Spintly access token will have an expiry. Client is responsible to update Spintly access token on the event that it is expired. An event listener can be attached in the following way. This event is sent whenever an api call fails due to access token expiry.
//Supports only one credential at this moment
let credentialManager = serviceProvider.credentialManager
credentialManager.logIn(accessToken: "") { (error) in
if (error != nil){
//handle
} else {
//success
}
}
//Calling above function will first logout existing credential even on login failure
credentialManager.logOut() //Logout existing credential if present
//Note: a token refresh handler must be registered prior to logging in any user. This should be
added in application didLaunch itself.
//In application onCreate()
let credentialManager = serviceProvider.credentialManager
credentialManager.setTokenRefreshHandler(self)
extension Application: TokenRefreshDelegate {
func refreshAuthentication(completion: @escaping (String?, Error?) -> Void) {
//Asynchronously get new access token
if (successfullyFetched) {
completion(newToken, nil)
}
else {
completion(nil, error)
}
}
}
8 Mandatory Checks
Once the user is logged in or once the user has opened the app and got the app in foreground, a check has to be made to see if bluetooth and location are on. If bluetooth and location are not on then access functionality won't work.
For iOS The bluetooth should be turned on (for iOS 11 and above bluetooth can be partially disabled from control centre by the user and the app is responsible to indicate to the user to turn it on completely).
For iOS 13 and above bluetooth permission is required as well.
During the initial login there can be in app prompts which give the user more context on why the bluetooth and location permissions and respectively turn on are required.
In app prompt informing user about location requirements:

System pop up for location permission triggered by the app action when the user continues:

The app should trigger a system location permission request for location always permission:

In app prompt to user to grant bluetooth permission:

System pop up for bluetooth permission:

Now if the user has not given the required permissions, then on each foreground of the app, the app is required to prompt the user to grant the required permissions and turn on the required services of location and bluetooth.
In app location pop up to inform the user to change the location permission setting to ‘Always’ if it is not so:

This should lead to app settings where the user should select ‘Always’ for the location:

Note: If location permission is not given by the user with the mode selected as ‘always’, the user will not be able to unlock doors while the app is running in the background.
If the user has removed the bluetooth permission from the app settings then on app foreground, the app should prompt the user to grant the permission:

At login and on app foreground, if the bluetooth is off (not solid blue in control center), the app should show an indication to the user how and where to turn it on (the blue bluetooth icon is what the user needs to be made aware about, access will work only when the icon is blue and will not work even when the bluetooth icon is white - white being the mode only where Apple peripherals can connect to the iPhone):

If the user is taken by the app to the bluetooth settings, the user needs to be informed not to just turn on the bluetooth radio button but also to click on ‘Allow New Connections’ such that it is discoverable:

Along with this, for iOS, in the Xcode project, enable the “Location updates” and “Users Bluetooth LE accessories”

9 Getting list of access points
This snippet of the code explains how to get all the devices to which a particular user has permission to.
let permissionManager = serviceProvider.permissionManager;
let accessPoints = permissionManager.accessPoints
// This is a list of doors the user has access to.
// To get update of when this list changes, attach an KVO observer
let observer: NSKeyValueObservation =
serviceProvider.observe(\.permissionManager.accessPoints, options: .initial) {[weak self] (_, _) in
print("observer called")
//refresh your list
}
//NOTE: remove observer when done to avoid memory leaks
class AccessPoint {
public let id: String

//Id of access point. Use this value to unlock access point

public let organisationIds: [String]

//Ids of Organisations to which the access point belong. Holds multiple values if the

access point is shared between multiple orgs.
public let name: String?

//Name of the access point
public let deviceTags: [String]

//Attached devices to access point (entry/exit)

public let hasRemoteAccessPermission: Bool

//Does user have remote unlock permission for this access point

public let hasProximityAccessPermission: Bool

//Does user have proximity unlock permission for this access point

public let hasTapToAccessPermission: Bool

//Does user have tap unlock permission for this access point

public let requiresMfaForClickToAccess: Bool

//Does user need to authenticate with device credentials to ble unlock this access point

(Authentication UI is managed by sdk)
public let requiresMfaForRemoteAccess: Bool

//Does user need to authenticate with device credentials to remote unlock this access

point. (Authentication UI is managed by sdk)
public let customAttribute: String?

//Custom attribute of access point setup by client. (nil if not set)

public let siteName: String?

//Name of site to which the access point is attached

public let siteLocation: String?

//Location of site to which the access point is attached

}
10 Starting the bluetooth Scan
This snippet of the code explains how to start the Bluetooth scan. Without this step, you won't be able to access the doors to which.
let accessManager = serviceProvider.accessManager
accessManager.startBleScan()
// The bluetooth should be turned on (For iOS 11 and above bluetooth can be partially disabled from
control centre and the app is responsible to indicate user to turn it on completely)
// For iOS 13 and above bluetooth permission is required as well
// NSBluetoothAlwaysUsageDescription and NSBluetoothPeripheralUsageDescription must be added to the
app's info.plist. Its value is used to display the message on request of bluetooth.
// NSLocationAlwaysAndWhenInUseUsageDescription, NSLocationAlwaysUsageDescription,
NSLocationWhenInUseUsageDescription are also required for proximity access.
// Make sure the following background modes are enabled under capabiltiesl
11 Additional checks
- For iOS The bluetooth should be turned on (For iOS 11 and above bluetooth can be partially disabled from control centre and the app is responsible to indicate user to turn it on completely)
- For iOS 13 and above bluetooth permission is required as well

For iOS, in the xcode project, enable the “Location updates” and “Users Bluetooth LE accessories”
12 On Notifications
This snippet of the code explains the function that needs to be called whenever the access point permissions are updated in the backend, so when permission changes happen, it’s the job of the client to alert the app that permissions have changed. When the client app receives the notification it needs to call the poll data function. This will cause the SDK to receive the new permissions from Spintly backend.
let syncManager = serviceProvider.cloudSyncManager
syncManager.pollData { (error) in
if (error != nil) {
//handle error
} else {
//success

}
}
// Call this whenever you want to refresh the local sdk data with cloud
// The sdk syncs syncs data by itself when app enters foreground.
// Apart from this the places to sync would be:
// 1. After changing the user's permission.
//To set up regular polling you can call the above function at background refresh
//Refer https://developer.apple.com/documentation/uikit/app_and_environment/scenes/preparing_your_ui_to_run_in_the_background/updating_your_app_with_background_app_refresh
13 Opening the Doors
Spintly provides 3 options to open the doors
- Click to Access: Listing all the doors in the UI, and clicking on a specific door
- Tap to Access: Here user just needs to tap the phone on the unit and the door will open
- Proximity Access: here the phone needs to be within the proximity of the device
The tap to access, proximity access can be enabled or disabled in the backend. The developer need not do any extra coding in the app for tap to access and proximity. If he wants to list the doors and wants to open the door by click to access, then he needs to use the following snippet.
let requestedPoint = accessPoints[n] // Requested access to a specific access point
let accessManager = serviceProvider.accessManager
accessManager.bleUnlockAccessPoint(requestedPoint.id, delegate: self)
extension YourVC: UnlockDelegate {
func didFindDevice(_ accessPointId: String, _ tag: String) {
//When device is available for unlock
}
func didUnlock(_ accessPointId: String, _ tag: String) {
//Device with given tag and attached to access point with given id unlocked
}
func didFail(_ error: Error) {
//Some error occured
}
}
// Only one unlock at a time is supported as of this moment so please avoid calling this function again without the previous one returning success/error.
Proximity access:
let accessManager = serviceProvider.accessManager
accessManager.setProximityDelegate(delegate: self)
extension YourClass: ProximityUnlockDelegate {
func didUnlock(_ accessPointId: String, _ tag: String) {
//Device with given tag and attached to access point with given id unlocked
}
}
14 On logout
When the user logs out of the app, it is also important that the app first stops the BleScan and then logs out from both the SDK ie the OAuth SDK and Access Control SDK. The following snippet of code does the job.
credentialManager.logOut()
spintlyOauthManager.clearSession();